Remote sources
With Remote Sources, our content federation utility, it's possible to add content from other systems and sources to the Hygraph API without having to migrate the content itself.
There are many use cases where moving content into the CMS isn't possible or desirable. Examples include content for which there is a different system of record (e-commerce/product data like price or availability, content from a different vendor like Github or IMDBT, etc) and content that is stored in legacy systems that can’t be easily migrated.
Remote Sources allow customers to create a single GraphQL API with content from all these different sources, providing flexibility for front-end developers and downstream applications.
Important conceptsAnchor
-
Remote Source: A system or product that holds content that needs to be combined with content in Hygraph, and which can be queried through a RESTful or GraphQL API. A single remote source can have different types of content (e.g. an e-commerce system might have products, categories, prices, etc). Every remote source has a unique (base) URL, such as Github, Shopify, Hasura, or a custom backend application.
-
Remote Field: A field inside a Hygraph model that connects specific remote data to an entry of that model. Remote fields are always related to a single remote source, and a single custom type. RESTful remote fields are configured with a path to a specific endpoint in the remote source, such as user details from Github, or price & availability from Shopify.
-
Custom Type: A GraphQL type that is used for content coming from a remote source. The custom types are combined with the auto-generated types inside Hygraph to create a single schema for content inside Hygraph and in the remote source. For RESTful remote sources, custom types need to be defined explicitly using SDL for all URL paths that will be queried in the remote source. For GraphQL remote sources, the custom types are auto-generated by using introspection on the remote source.
-
Custom Input type: A specific kind of GraphQL type that is used to define input parameters for queries to remote sources.
Adding a remote source to your projectAnchor
Configuring a remote sourceAnchor
-
Navigate to the Schema Builder.
-
In the left sidebar, find the
Remote Sourcessection located at the bottom of the list, and then click on+Add.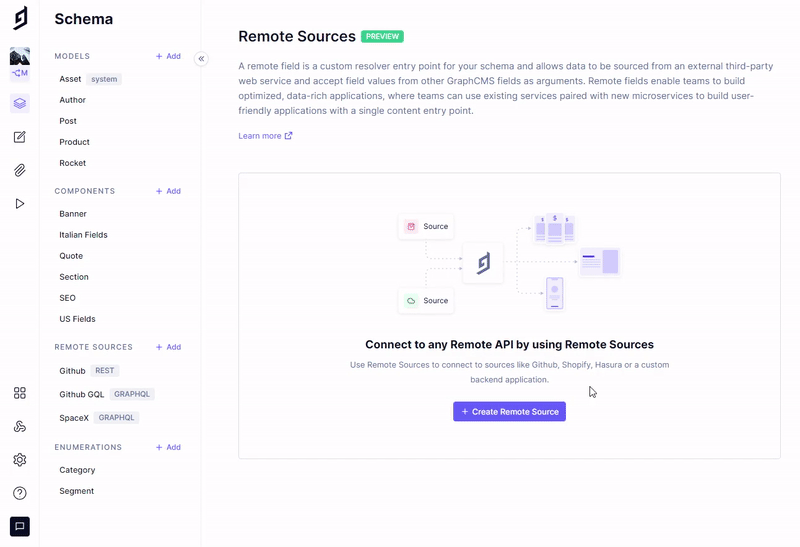
Add a Remote Source -
Enter a display name and, optionally, include a description. A prefix is auto-generated and will be pre-pended to all types that are created for this remote source. It’s also possible to enable debugging for this remote source, which will provide more information in case of errors. Make sure to disable this once the remote source is properly set up.
-
Set the type to either REST or GraphQL, depending on the type of API that this remote source will connect to.
-
Provide a base URL. All remote fields that connect to this remote source will use that base URL.
-
Optionally, you can include HTTP headers that will be added to all API requests for all remote fields connected to this remote source. Example use cases include authorization and accepted media types.
-
If you selected REST in step 4, you can now define your custom types. These provide the mapping from the API responses to the GraphQL schema. Custom input types can optionally also be defined here.
If you selected GraphQL in step 4, you can optionally provide an alternative introspection URL and custom headers to send to the introspection endpoint. If no separate introspection URL is provided, the base URL will be used (the default behavior for most GraphQL APIs is to allow querying and introspection on the same URL). Custom input types can optionally also be defined here.
Creating a custom type definitionAnchor
When connecting to a remote REST API you will have the option to define a Custom Type Definition, which allows you to specify the shape of the response coming from the API. It will allow you to query the REST API as if it were native GraphQL. These Custom Type Definitions use GraphQL SDL (Schema Definition Language).
In order to create such a definition, you can follow these steps:
- While adding a new remote source, or editing an existing one, scroll down to
Custom Type Definitionsand click on+Add. - You can now use a tool like JSON2SDL to transform the JSON response from your API into valid GraphQL SDL. You might need to make a few tweaks to the generated SDL, especially changing the
JSONtype toJson(note the difference in casing).
Here’s an example of what that would look like:
-
Add the SDL for your custom type to the input field. It’s possible to add multiple types in a single input field, after saving the types will be moved to separate fields.
-
Press
CreateorSaveon the top right corner
Custom types also support nesting, so they can make use of another type, as shown below:
type Product {name: StringmetaInfo: MetaInfoslug: String}
type MetaInfo {createdAt: DateTimecreatedBy: Stringcurrency: String}
In this example, the custom Product type makes use of another custom type MetaInfo.
How to use a custom type definitionAnchor
After successfully creating the custom type, it can be used on your Remote Field (REST).
- Open any of your models and either create a new Remote Field (REST) from the right hand field picker or edit an existing Remote Field (REST). On that Remote Field, select the just created custom type under Return type.
-
When querying your remote field, you will now have a sub-selection of the fields you defined. In this case, the remote field is called
githubInfo{authors {idnamegithubInfo {idnameurl}}}
This will be explained in detail in the “Adding a remote field” section.
Creating a custom input type definitionAnchor
Remote fields also allow you to pass along input parameters to your remote source endpoint. This can be useful if the identifiable information for the remote data isn’t kept in Hygraph, but defined on a request basis. This is relevant for both the REST and GraphQL remote sources.
To create such a definition and to use it in a query, you will need to follow these steps:
-
While adding a new remote source, or editing an existing one, scroll down to
Custom Input Type Definitionand click on+Add. -
Similar to the Custom Types, you need to use the GraphQL Schema Definition Language (SDL) to define what the input parameter will look like. A tool that could be used here is JSON2SDL, which allows translating a JSON object to a valid SDL. Keep in mind that we are not defining a type here, but an input.
Let’s take an example of passing a
productIdto our Remote API, that will be used as an input argument. The SDL would look like this:input productInput {productId: String!}
How to use a custom type input definitionAnchor
-
On your remote field, you can now select the just created Input as
Input Argument. For this, open one of your models and add a new remote field or edit an existing one. -
Click on
+AddunderInput arguments, select the input type you just created, and give it an API ID.
Using a custom input type -
After saving the field, you can head into the API Playground and test the just created input argument, which will work like this:
{pages {idproduct(product: { productId: "123" }) {nameslugprice}}}
Click here for a detailed example on how to work with custom input types.
Adding a remote field to your modelAnchor
After adding a remote source, it's now time to add a remote field to a model. This is slightly different for RESTful remote sources vs. GraphQL remote sources, so we will explain this step for each of them separately.
Note that remote fields can only be added after at least one remote source of the corresponding type has been configured.
RESTAnchor
-
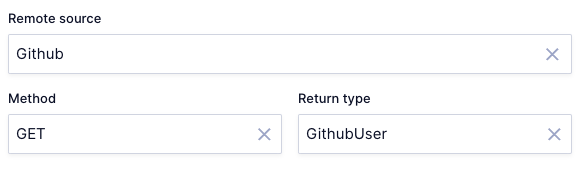
Navigate to the Schema builder, select the model that will contain your remote field, scroll down the field type list located on the right side of the screen, and select the REST field.
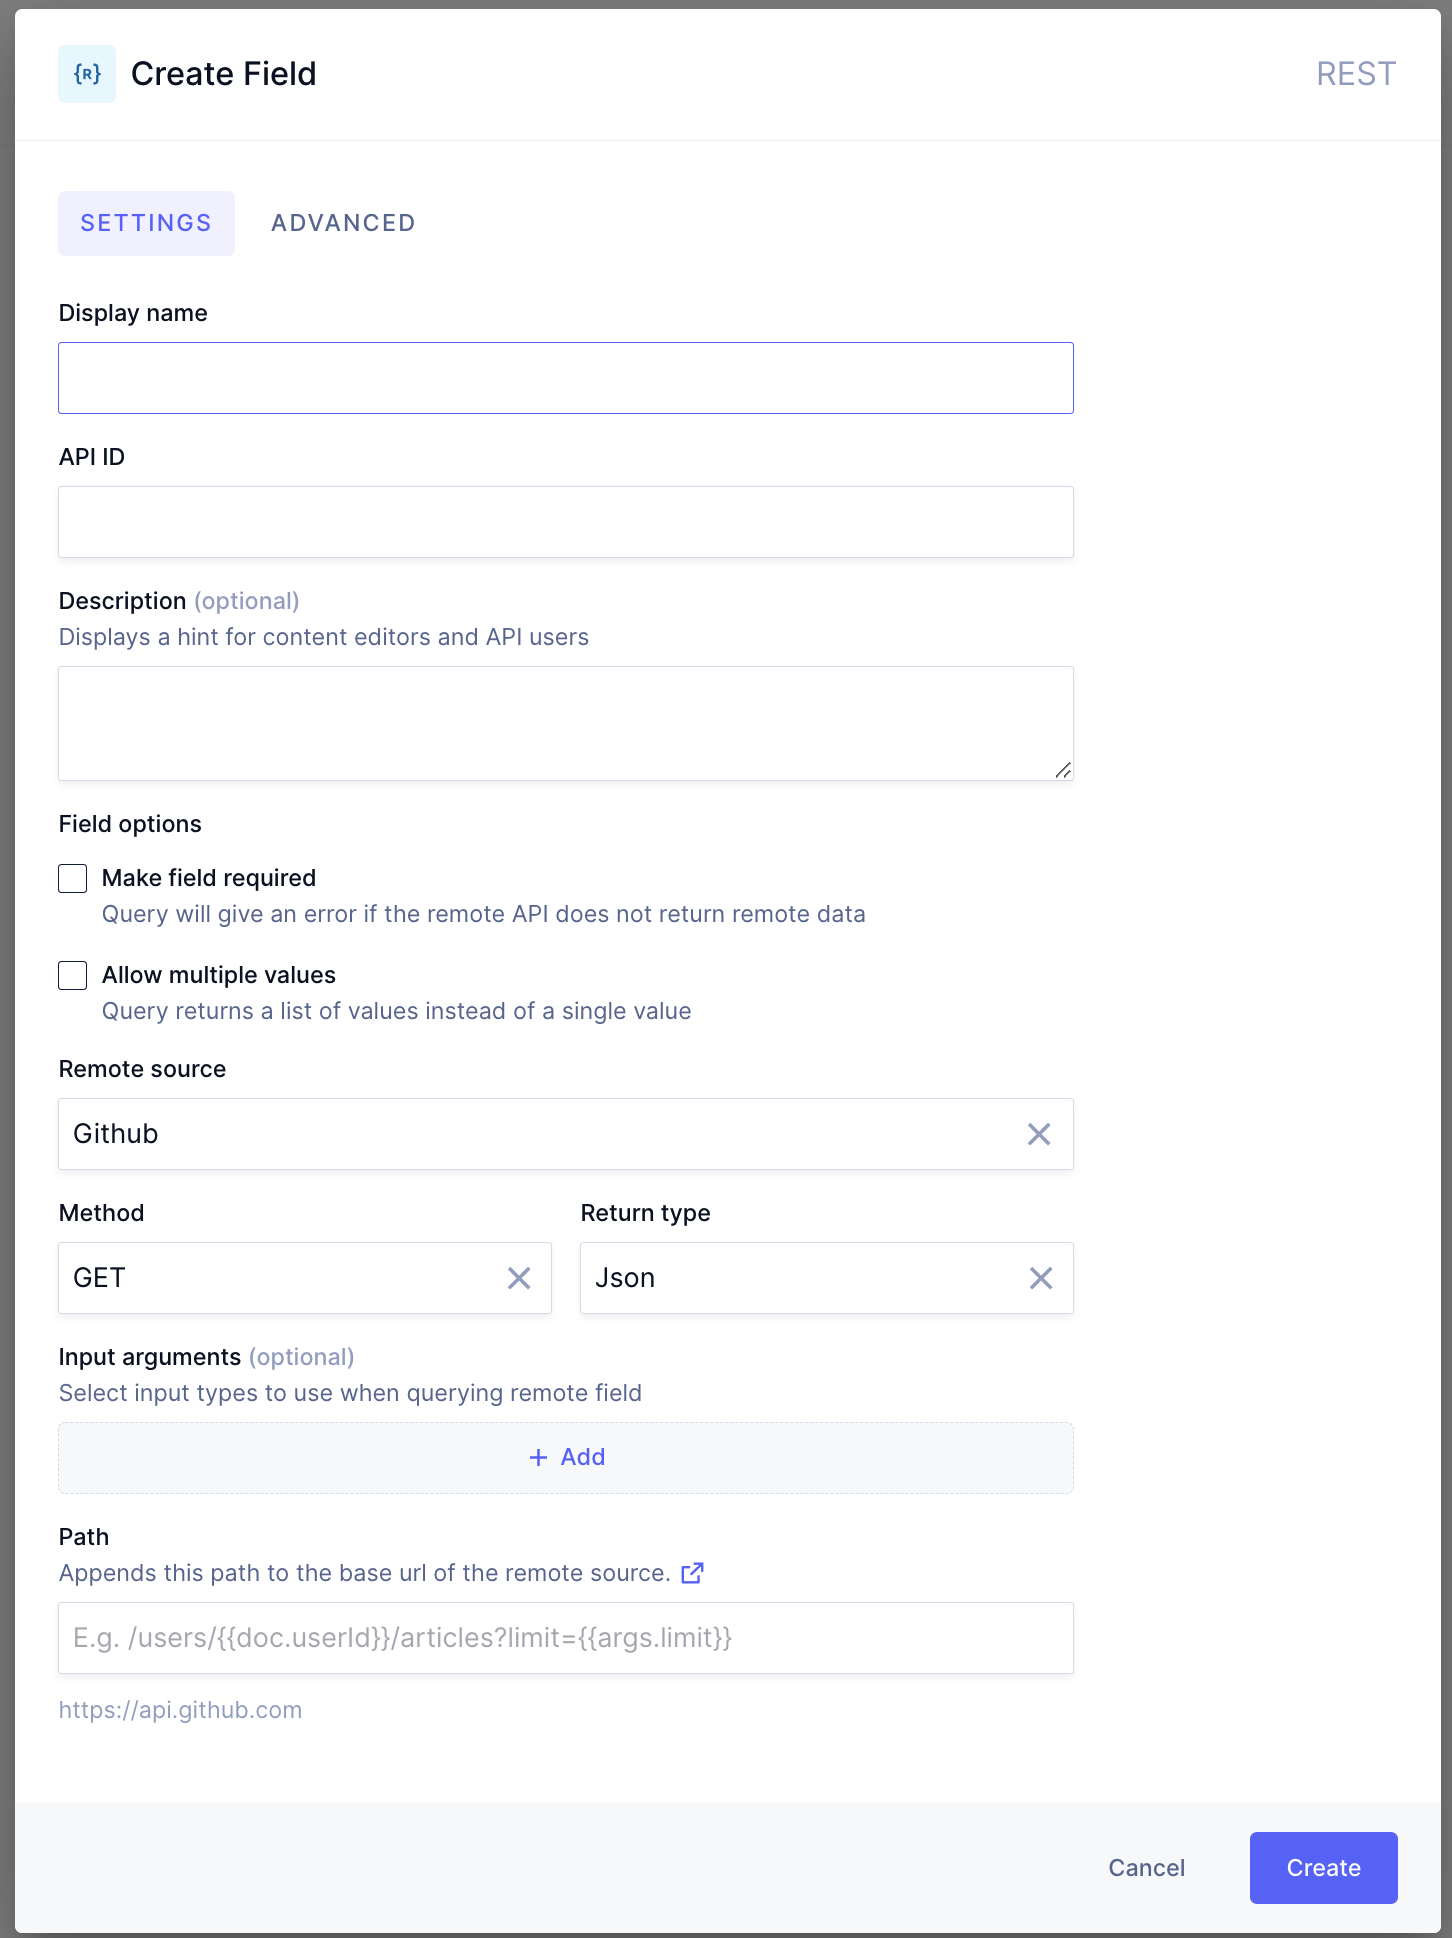
Creating a REST Remote Field -
In the Create Field dialog, fill in the display name, API ID, and optionally add a description.
-
If the remote API for this field returns an array of the chosen custom type instead of a single object, make sure to select the
Allow multiple valuescheckbox, under Field options. So if you defined your custom type to be “Product”, but the Remote API returns an array of products, you need to make use of theAllow multiple valuesoption, so the request won’t return an error. -
Select a previously configured
Remote sourceand an HTTPmethod. ForReturn type, select one of the custom types that you configured for the remote source. This custom type needs to (partially) match with the response of the API path that will be requested in this field. You can find detailed information on creating custom types here. Alternatively, it’s possible to set the response to be a scalar type (string, Boolean, Json, etc). -
You can optionally add
Input arguments. Adding an input argument is done by providing anapiIdfor the inputs (which can be used in the configuration of the URL path), and selecting a previously configured custom input type for the remote source. Multiple input arguments can be added by clicking on+Add. We understand this is a difficult step, so we’ve provided an example below for more details. -
Configure the
Paththat will be queried for this remote field. This path will be added to the remote source base path to get a resulting endpoint. In the path definition, you can use handlebars notation (start by typing a{) to use fields from the document or from the input arguments, if defined. This way, you can dynamically build a URL path using field values from the same content model or from an input parameter value. As an example, if the model has a field calleduserId, it’s possible to build a path that looks like this:/users/{{doc.userId}}/repos.
GraphQLAnchor
-
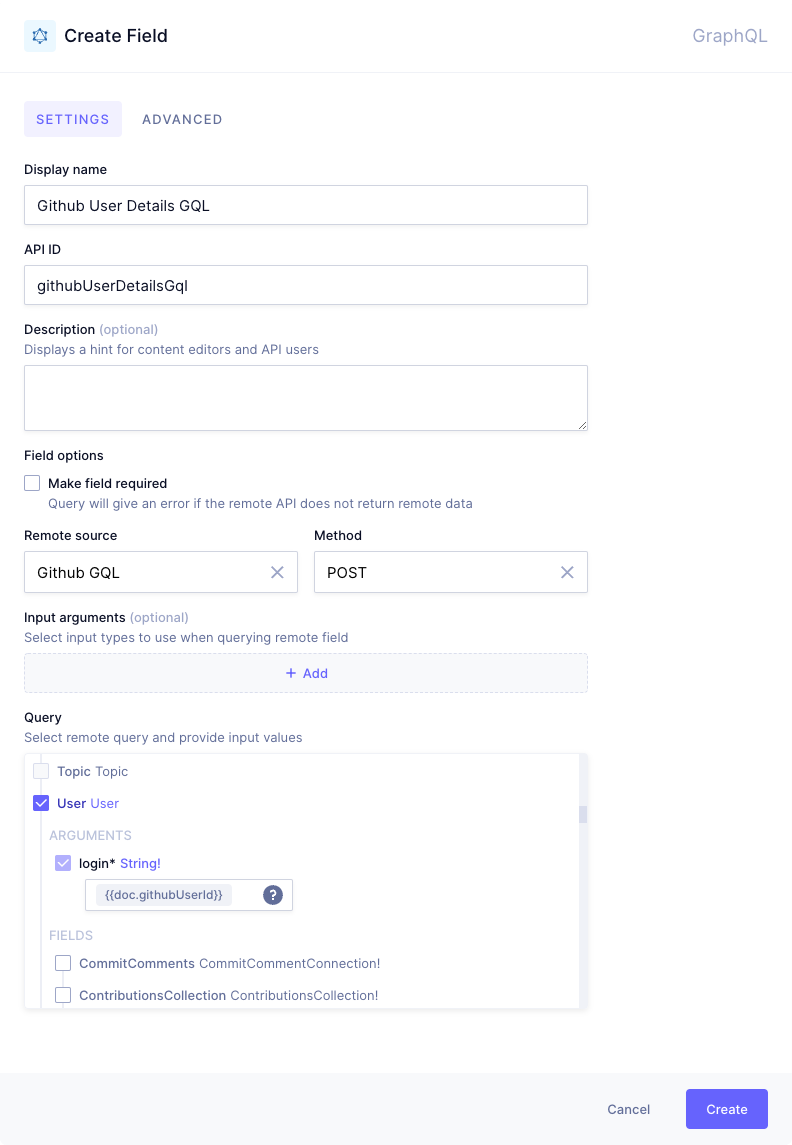
Navigate to the Schema builder, select the model that will contain your remote field, scroll down the field type list, located on the right side of the screen, and select the GraphQL field.
Creating a GraphQL Remote Field -
In the Create Field dialog, fill in display name, API ID, and optionally add a description.
-
Select a previously configured
Remote sourceand an HTTPmethod. -
You can optionally add
Input arguments. Adding an input argument is done by providing anapiIdfor the inputs (which can be used in the configuration of the URL path), and selecting a previously configured custom input type for theRemote source. Multiple input arguments can be added by clicking on+Add. We understand this is a difficult step, so we’ve provided an example below for more details. -
Now select the query that will be the
Entry pointinto the remote schema from the tree that is shown at the bottom of the Create Field dialog. This tree is populated using introspection, and will show all available queries in the remote source.-
When selecting a query, the tree unfolds to show all arguments for that query (in purple), available sub-queries (enabled and showing type in blue), and available fields or scalars (disabled and showing with type in grey). It’s important to note that the selected (sub)query will determine which data from the remote source can be queried through Hygraph. All arguments, scalars, and subqueries in the remote source that are below the selected query will be queryable. Other values and queries in the tree will not be queryable unless they are part of another remote field.
-
Arguments that are required show a purple asterisk (*) next to their ID, although there is no validation on the value done inside Hygraph. It’s possible to use handlebars notation inside a parameter field. Start by typing
{, which will bring up suggestions based on the fields on your model.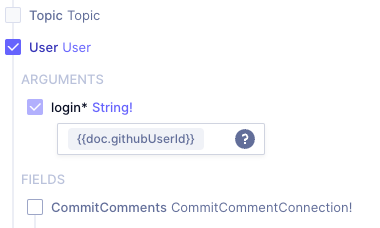
Selecting the Schema entrypoint -
For queries that return a single value, it’s also possible to select a sub-query as the entry point. Note that this means that only fields inside the selected sub-query are available to be queried through Hygraph.
-
ErrorsAnchor
Irrespective of the model you selected, the default behavior for errors in querying remote fields is that the query to Hygraph will return successfully but with a null value for the remote field and an error message to indicate the remote field could not be queried. If the value of the remote field is critical for the proper functioning of the front-end application, it’s possible to mark the remote field as required. With this setting enabled, the whole query to Hygraph will return an error if the remote field does not provide a successful response.

Advanced settings (Cache)Anchor
Note that advanced settings apply to both types of remote fields
- Although HTTP headers can be configured on a remote source - meaning on all requests for all fields that use this remote source - it’s also possible to add additional HTTP headers on a specific remote field. The headers are additive, but if you configure the same header both on the field and on the remote source, the value from the remote field will take precedence. Additionally, it’s possible to have all client headers to Hygraph forwarded to the remote source. This can be useful to forward user context to the remote server, for example.
- By default, Hygraph caches queries that include remote fields using a TTL cache with a value of 15 minutes. The TTL can be overridden in the remote field settings dialog (minimum TTL value is 60 seconds). However, please note that if the remote source sends a cache-control response header, this will override the cache configuration in Hygraph.
- Optionally set field visibility. For the default setting of “read-only”, the remote field is displayed in the content form with a link to the API playground. If the field visibility is set to “API only”, the remote field is not displayed in the content form but is still available to query through the API.
Querying a remote fieldAnchor
After configuring the remote field, it’s added to the Hygraph schema and immediately queryable through the API. Press CTRL/CMD+Space or open the Explorer view to see the available sub-fields inside the remote field.
Note that the remote source prefix is added in front of the type for easy identification.
Below screenshots demonstrate what this looks like for the User endpoint of the Github API:
Known issues and tipsAnchor
The Remote Sources feature is currently in a Feature Preview state, so there might be hiccups or unexpected behavior when working with them. Please always feel free to reach out via our on-site chat in the left-hand sidebar of your project to let us know if you have any feedback or want to report a bug.
Currently, we are not re-fetching the schema of a GraphQL Remote Source after creation. If you update that remote schema, you will need to create a new remote source for that GraphQL API to see schema changes reflected.
If you work with Remote Sources and you query a lot of entries at the same time, make sure to use sensible pagination limits within Hygraph, so requests to a third-party API are not rate limited or blocked.
When defining a custom type, you can use all the default GraphQL Scalars such as String, Int, Float, Boolean, ID and additionally Json. ! can be used to indicate a field not being nullable, [Type] will indicate a list (array). More info on the object types and fields can be found here: https://graphql.org/learn/schema/
Example - Working with custom input typesAnchor
In this example, we will see how we can define and use a custom input type on a remote field. We will be using the Github REST API, specifically the users endpoint.
Step 1: Configure Github as remote sourceAnchor
We'll first add the Github API as a remote source and configure the right custom (input) types.
Set up a new remote source as described above, using [https://api.github.com](https://api.github.com) as the base URL, then add a custom type with the following SDL:
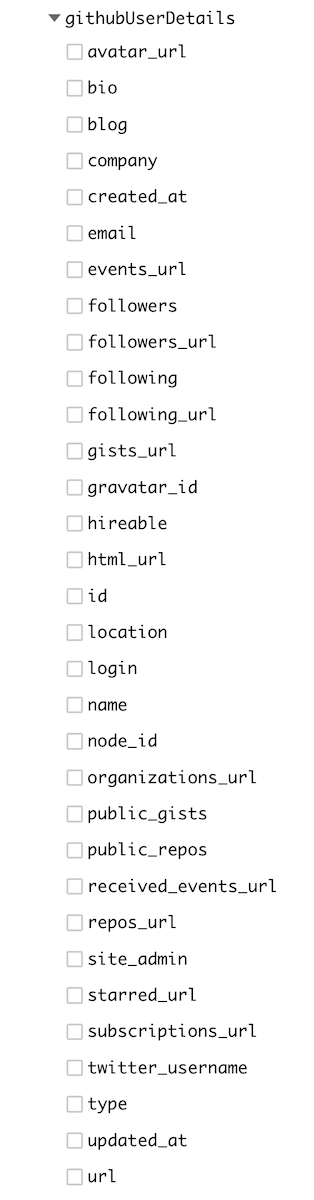
type User {avatar_url: Stringbio: Stringblog: Stringcompany: Stringcreated_at: DateTimeemail: Stringevents_url: Stringfollowers: Intfollowers_url: Stringfollowing: Intfollowing_url: Stringgists_url: Stringgravatar_id: Stringhireable: Booleanhtml_url: Stringid: Intlocation: Stringlogin: Stringname: Stringnode_id: Stringorganizations_url: Stringpublic_gists: Intpublic_repos: Intreceived_events_url: Stringrepos_url: Stringsite_admin: Booleanstarred_url: Stringsubscriptions_url: Stringtwitter_username: Stringtype: Stringupdated_at: DateTimeurl: String}
Also add a custom input type with the following SDL:
input githubInput {userId: String!}
Step 2: Set up the remote fieldAnchor
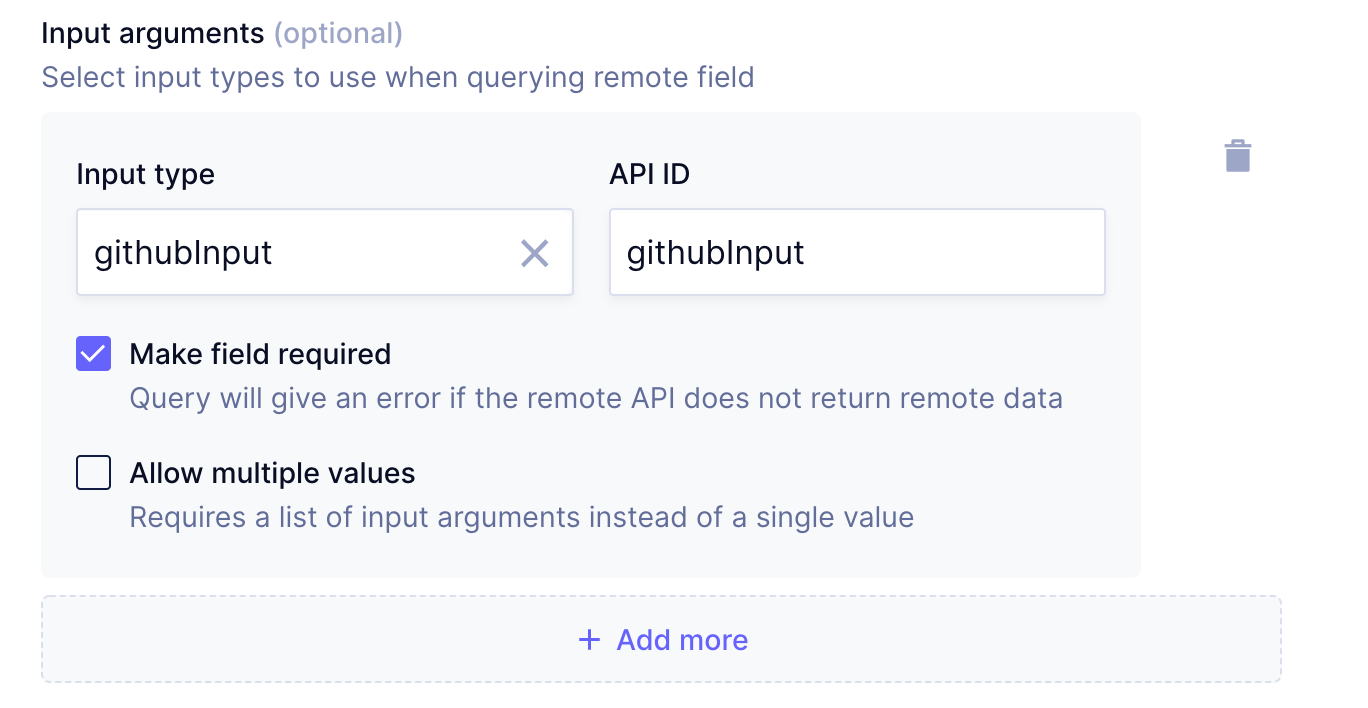
In an appropriate model, set up a REST remote field. In this example, we will use a model called Author and set up the remote field with apiId githubUserDetails. In the remote field config, add an input argument and select the input type to be the previously created githubInput. In the example, we will use the auto-generated API ID githubInput for the input arguments. We’ll also set the field to be required since we will make the path depend on the input value.
Now configure the remote field’s path to use the input argument. You can use the autocomplete feature in the handlebars notation for this.

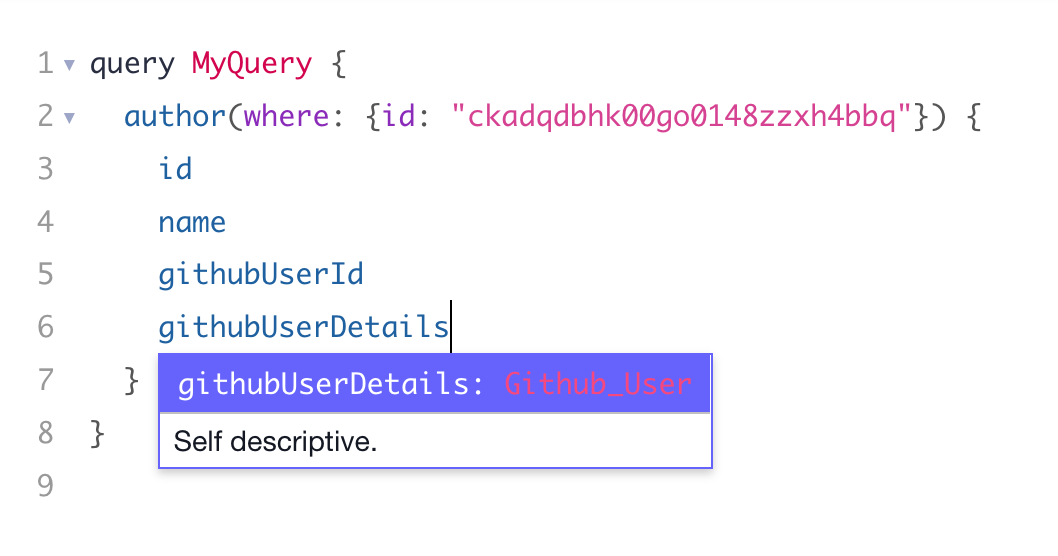
Step 3: Query the fieldAnchor
Make sure there is at least one entry for the selected model, and then head over to the API Playground. The input argument can now be used in a query in the following way:
query MyQuery {author(where: { id: "<some_id>" }) {idgithubUserDetails(githubInput: { userId: "hygraph" }) {namebio}}}
💡 Notice that since we've made the userId parameter required in the custom input type (by adding a ! at the end), there will be an error if we don’t supply the value properly.
